February 28, 2012

PSC # 21- Round Robin Die Cut Challenge

It's Wednsday again and the ladies at the Perfect Sentiments are at it agian. This week we decide to exchange die cuts with a DT buddy and make a card. You won't believe all the great cards that we have to show you. So let's get started...

The challenge: Make a card with Die Cuts
The twist: You can use any sentiment just make sure it is on the front of the card.
The Sponsor: The Perfect Sentiments Team


The winner will receive this $ 5.00 gift card from the Perfect Sentiments Team.


Now to show you my card. I started with some great die cuts that my design team Round Robin buddy Jessica sent me. I had plenty to choose from so I put them all on the table just to check them out. Then it all came together. The mat she sent was great so I inked it and put it on the card. Then I made the flower by stacking two pattern paper cuts. The flag was stamped with the sentiment. The butterfly was from my stash. The disc under the flower was cute but I decided to wrap string around it to spice it up. Oh, the vintage button paper and button was in my stash and it just seemed to fit just fine.
Make sure you stop by all the other DT members blog and see what they have created . Then get to crafting and join in the fun over at the Perfect Sentiments
Here is a list of all the DT members...
Maggie ~ http://maggiescathouse. blogspot.com/
Sam ~ You are here
 
Thanks for stopping by !!
Sam

February 22, 2012

Friendships Garden- Challenge

Friendship's Garden is having another great challenge this week. Make a project with the colors in this photo.
A lot of great colors to choose from. The theme is "Birthday" so I made a tag to put on my next present I need to wrap. I have a lot of family birthdays coming up so it will come in handy.
Thanks for stopping by and join us in all the fun over at Friendship's Garden.

February 21, 2012

Perfect Sentiments Challenge- "Get Well" is the Theme

This weeks challenge over at The Perfect Sentiments is to make a card with a sentiment of "Get Well" and the twist is to use the following sketch. You can turn it or twist any way you want. Just make sure your sentiment is on the front of the card.


I started my card with a white base. Then I added a digi cloud I had in my files. It's funny how those digis come in handy. I inked the edges and then I took a strip of yellow and used my punch on both side to make a cute pattern. A clean and Simple card but cute.


Our sponsor for this challenge is Pattie’s Creations. She will supply the winner 1 free digi.

Thanks for stopping by and don't forget to check out all the other DT blogs to see what they did with the sketch. Then go to The Perfect Sentiments and join in the fun.
Here is a list of all the DT.
Sam ~ You are here

February 15, 2012

Good Morning everyone... Two post today so ...................
If your looking for some Paper-Piercing with The Perfect Sentiment click ....Here


OR you can see my post on being the 1st Design Team Spotlighted at Frienship's Garden....
                                                      Just scroll down it is the first post !!!

HAVE A GREAT DAY!!!
Hi Everyone... .
It's Bonus Week and I'm the first of many Design Team spotlights that will be happening  on Friendship's Garden. I want to start by telling you about what inspires and cause me to be so crafty.
This is what I get to see every morning.
Since paper crafting involves taking alot of pictures I can't think of a better way to tell you about me then in pictures.


This is my husband Tony.
Me at a fly-in in Wisconsin
Little Buddy and Tony

I live in Mobile, Alabama and me and my husband have been married for 25 years and  have two grown children. The only thing that keeps us at home is our animals.  The only reason we go to work is to fund our many obsessions, ( Hobbies..) I started with Scrapbooking about 20 yrs ago when my kids were little and I was a stay at home mom. But now if you stop by my blog I could be doing cards, pages, mixed media, DIY storage idea, refinishing furniture. Yep I like to do it all. Since our life is kind of quiet without the kids home my little dogs have to be my subject A LOT but they don't mind. I have even started scrapbooking for other people just to "Get my Fix"

So enough about me I want to share one of my favorite things to make with my Martha Stewart score board. Everybody knows it is used to score and make cards but have you ever made a paper rosette with it? Well, if not I'm going to walk you through it step by step.

Supply list:
1) Solid or Pattern paper cut at 3/4" or 1" strips. I like to use double sided paper. If you want to use a scalloped punch on the edges I suggest you do that before you cut the strip.
If you double the size of your strips that will be the size of your finished rosette.
2) Punched circles or punched flowers to glue your rosette to.
3) Martha Steward score board and bone folder.
4) Fast Drying glue- I use glossy accents


Step 1- Take your strips and score them every 1/4"

Step 2- Fold paper back and forth and then secure the end to each other with Glossy Accents.                        .

Step 3- Take your small punched circles and put a little puddle of glue.
Step 4- Now gather your crimped paper together really tight at the top and over the circle with the glue.

Step 5- Now the tricky part. While keeping the top together and getting the bottom to spread you push it down and stick it to the glue. Hold your finger on it for a few minutes to let the glue start drying.
Then get something to sit on top of your Rosette till it completely dries.
Now your ready to decorate it anyway you see fit.
Here are the ones I made and some I had in my stash.
I layered rosettes to make this card
The purple rosette has the flower behind it.
The yellow one I made and cut the edges with my scissors. Then I used two foil cupcake liners to make the middle and attached fuzzy balls.
Rosettes are so versatile you can use them anywhere.I like to make them ahead of time so that I will have them on hand just like any other embellishment.
Thanks for stopping by and don't forget to join us next week for another great challenge and prizes.
Sam


February 14, 2012

Paper Pierced Holidays & Seasons

Hi Everyone it is that time again !!!
A great Challenge over at The Perfect Sentiment.
Since everybody is all into Valentine we have decide to do some paper-pierced cards for any Holiday or Season.
The DT was given images from Bugaboo Stamps ( who just happens to be our sponsor this week) to work with this week.
So I decide to go with getting a jump on my Easter Cards.
Paper-Piercing isn't something I have ever done before. So, as usual off to the You Tube videos to check it out. Don't seem like you can mess this up. It is really easy and can be done on anything.
I colored this cute little bunny, ruffed up a grey card and tied a bow. Easy, Peasy !!
I put pop dots to hold my mat with the bunny up so that the holes wouldn't collapse when glued to the card. Not sure if it would make a difference but It did to me.
I will be doing some more paper piercing in the future.


The prize for this week will be seven (7) free digital images or  $21.00 worth of stuff at
All you have to do is make a card with the theme ( Holiday or a Season) and add the twist-
 Paper Piercing.
Don't forget to make sure your sentiment is on the front of the card.


Don't forget to stop by the DT blogs for more inspiration and then drop on by The Perfect Sentiment and join the fun.


Sam ~ You are here

February 8, 2012

Friendship's Garden Challenge # 9

Hi everyone !!!

  Welcome to challenge NINE (9) and our second quarterly blog hop sponsored by Designs on Cloud Nine! We're calling it  ...

It's A Love Thing ....

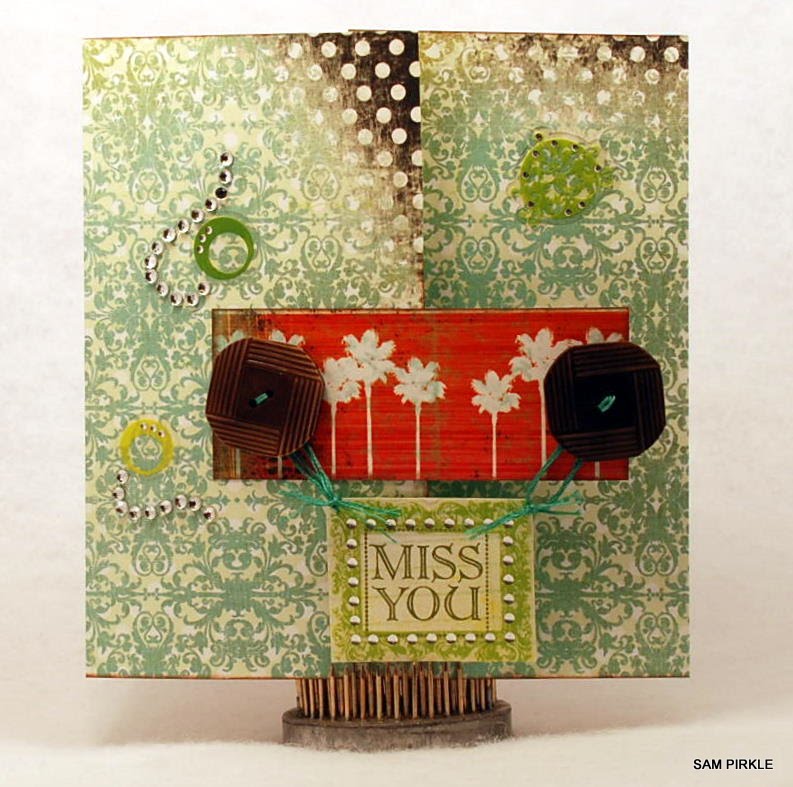
  Love is the theme, and your project must have at least 3 embellishments on your card! (Buttons, ribbon, lace, trim, bling, brads, die cuts, chipboard, etc.) As usual, you should make a project based on the theme and link it up Friendship's Garden.  
We will choose the top 3 and winner of the gift certificate from Altered Angel via vote by the Garden Girls.

Now for the blog hop info ... Michelle at Designs on Cloud 9 was very generous and gave the Garden Girls a free file for us to work with, and if you win this blog hop, you could buy it for your very own with the $20 gift certificate to the Designs on Cloud 9 online shop!!!

Here are the rule:
First you must become a follower of Friendship's Garden. (if you haven't already). Leave us a comment on their saying you have done this.

Second, please go become a fan of Friendship's Garden on Facebook. Leave us a comment saying you have done this.

Next, go visit the Designs on Cloud 9 shop and pick out your favorite file and come back here and leave a comment telling us which file is your favorite!

Then you must go 'like' Designs on Cloud 9 on Facebook, then go back to Friendship's Garden and leave a separate comment that you've done that.

Next you must visit each of the Garden Girls blogs and leave a comment. Some of the Garden Girls are offering their own giveaway, so leaving a comment there gives you an extra chance to win a prize!  Then go back to Friendship's Garden and let us know that you have left a comment for all of the Garden Girls.

That gives you five (5) chances to win the gift certificate from Designs on Cloud 9!!! If you only do one, you get one chance, if you do 3 you get 3 chances, and so on. The winner for the $20 Designs on Cloud 9 gift certificate will by chosen via a random number generator from the comments received on the Friendship's Garden.
Now for my project I decided to take the image and make a box to put a HUGE candy bar in. The Image was just so cute I wanted to do something different and I think I did.
The sentiment was from Pink By Design... I love being a "Stamp of the Month" member. I made bows for the bees shoes and added glimmer mist to the wings. Bee Mine came with the digi file so I cut it out and made it a tag to hang from his little leg..
I hope you like it and it gives you some inspiration. Now hop on over to Jamie and see what great idea she will show you. If you get lost only the way I have listed all the Garden girls to help you out.
                   SAM- you are here

February 7, 2012

PSC18: Inspired With Love

It's Wednesday again and that means it is time for another challenge over at The Perfect Sentiments. This weeks challenge is  "Inspired With Love"
     
Create a card with a sentiment that lets someone know you "love them". Sentiment must be on the front of the card. This does not have to be for Valentine's Day.


Now for the twist:
Use the attached photo as inspiration for the design of your card. 
I love this picture. It reminds me of Summer, my favorite time of the year. So, when I first looked at this picture I noticed the colors like everybody else. Then after looking at it further I realized that the patterns on the wicker chairs and the surf board really excited me and thats what i used to make my card. I started with a Wild Card cartridge and printed this great pattern and attached it to my pink card. The flower I cut from Storybook. I cut the flower at 3" and used a light and dark pintk so that I could give it some dimension. Then I cut the leaves also at 3" from Storybook.


The sentiment and brads I had in my stash.
Thanks for stopping by and please visit all the other Design Team members for inspiration. This week the challenge is sponsored by Shelly's Images.
The winner will receive one digital image from Shelly so put your crativity hat on and join us for this fun challenge at The Perfect Sentiments.

Jan 

February 4, 2012

Ticket to Love- Day 2

Welcome to day two of our "Ticket to Love" blog hop. I hope you got here from Cindy's blog because that means your on the right track. If you just happen to stop by my blog go to Lissa's blog and start from the begining so you don't miss any of the great project we have for you to see.
If you stopped by yesturday you saw the ornaments I made for my little metal tree. If you didn't you can click here to see it.
Now for today's project I decided to make my favorite valentine a little something. Tony loves Reeses Peanut Butter Cups so I decided to make a box to cover it and then fancy it up.
So this is what I started with....
Then I used a little fancy paper from The Paper Studio and Doodle Hearts and my Martha Stewart Score board to score the edges of the paper to make a box. Added some stickers from my stash and this is how it turned out............................ Cute ???
They always so the way to a man's heart is through his stomach !!!LOL..LOL

I'm so glad you decided to join us again today and if you want to go back and see something again I have listed the lineup below. Thanks again for joining our blog !!!
Sam

Lissa Marie - http://somanycrafts.wordpress.com
Ashley - http://www.theglamoroussideofscrapping.blogspot.com/
Ellen ♥ CardMonkey - http://cardmonkey-business.blogspot.com/
Jen Blue Hawkins - http://scrapaholicjen.blogspot.com/
Yvette Lopez - http://gammascreativecorner.blogspot.com
Melissa Haereiti - http://www.Timeweavers.com
Anita Meadows Cannon - http://www.anitaandbugs.blogspot.com
Zenita Barnes Smith - http://scrappinwithz.blogspot.com
Cindy Marshall - http://www.cindys-greencricut.blogspot.com
Sam Sheppard Pirkle - http://scrappingwithpirkie.blogspot.com

February 3, 2012

Ticket to Love

Welcome to the first day of our two day hop to show off some great ideas for Valentine. This group of ladies have come up with some great ideas I hope you have enjoyed the projects so far. If you got here from Cindy then you are on the right track. If you just happen to stop by go to Lissa Marie and start from the begining so you don't miss anything.

For my project I had this great metal tree that I used at Christmas time to hang a few special ornaments and I just didn't want to put it up. I decide to decorate it for the little holidays durning the year. So I got our my cricut and cut out hearts,lips,XOXO. I used Wild Card and Martha Stewart Seasonal Cake .I husband brought home some safety wire which is really easy to bend so I swiped a little from him and made my own hooks. I started by just twisting the wire around a pencil.


Now don't get all upset because I'm the lost stop just come back tomorrow and we will be doing it all over again with new projects to share.....
Here is the entire lineup if you get lost along the way.
Thanks for stopping by !                         Sam


Lissa Marie - http://somanycrafts.wordpress.com
Ashley - http://www.theglamoroussideofscrapping.blogspot.com/
Ellen ♥ CardMonkey - http://cardmonkey-business.blogspot.com/
Jen Blue Hawkins - http://scrapaholicjen.blogspot.com/
Yvette Lopez - http://gammascreativecorner.blogspot.com
Melissa Haereiti - http://www.Timeweavers.com
Anita Meadows Cannon - http://www.anitaandbugs.blogspot.com
Zenita Barnes Smith - http://scrappinwithz.blogspot.com
Cindy Marshall - http://www.cindys-greencricut.blogspot.com
Sam Sheppard Prikle - http://scrappingwithpirkie.blogspot.com

February 1, 2012

PSC17- Missing a Button

Hi Everyone,
It's my first post as a new DT member over at Perfect Sentiments. I am so excited to be part of this talented group of ladies. This weeks challenge was to create a card using the sentiment "Miss You" and the TWIST is to use button or buttons.
I decided to make a gate fold card and use buttons to hang a sign . I helped my husband's aunt clean out some boxes over at his grandmother's house and we found a box of vintage buttons. I was gitty as a school girl when I saw them and she couldn't tell me no. I love vintage !! Hope you like my card.
Now go on over to Perfect Sentiments and check out all the great cards the DT made to get some inspiration and join our challenge.

Sam